Archive for Planning

My Gardening Goals and Dreams for 2017

A new year is starting- time for some new gardening goals!

A new year is starting — time for some new gardening goals!

Hi there! It’s been a hard few months for me, trying to not worry too much about the future, but I’m doing my best to re-focus on what I can do. I urge all to stay aware of clean gardening practices and what we can do for the environment: not using chemicals, recycling/composting, participating in clean-up efforts in our communities, and last but not least, sending your Senators and Representatives a call or an email asking them to keep as many environmental protections in place as they can. You can reach them all at (202) 224-3121. The Capitol operators can help you find your Senators or Representatives, even if you don’t know their names.

We have a lot of work ahead of us! I don’t mean to rant on, but really, who doesn’t want a clean and healthy world? I think we can all agree on that! I think that is my biggest dream. I hope we can curb our losses at the EPA. Climate change is real!

Here in my little corner of the world, I managed to get quite a lot finished up in 2016, but I still have so much to do. This year’s main focus is on improving the areas under and around the deck.
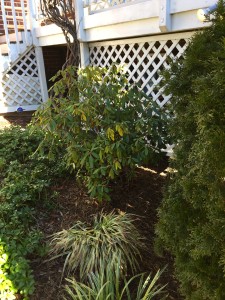
It was time for an edit in this garden. With more shade from a tree, it was out with the sedum and in with a transplanted rhododedron.

It was time for an edit in this garden. With more shade from a tree, it was out with the sedum and in with a transplanted rhododedron.

Here are my goals: I’ll make an designated area to place the trash can and recycling bins that is both out of sight, but still easy to roll out to the curb. This also will improve the area where I store my flower pots, extra hoses, etc.  And, there is one area I couldn’t work on last fall because I ran out of time — I need to lift some of the bricks on the back walkway and level them. After sixteen years, the ground has sunk around the plexi pipe that carries the runoff water from the downspout — should be an easy fix! Third, I will use my brick saw to cleanup the edge of the walkway where it connects to the driveway.

All the cosmetic work will boost the curb appeal, too — always a plus. When spring arrives, the garden around the base of the deck will get some annuals to really fill out the space and give some added color.  Looking at the winter garden, when most everything is bare or died back to the ground for the season, things look bleak, so I will post a  picture when everything has sprung back to beautiful life and show some before and after shots in a few months.
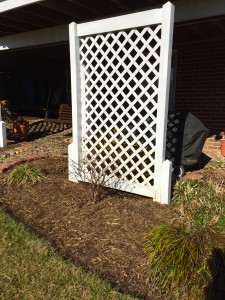
Here's a photo of my re make of the old planters into privacy screens. I removed the rotted supports and replaced with posts I had saved from an old job. These are buried 3 feet into the ground, no cement, so they can be re-positioned later if I want.

Here’s a photo of my re-make of the old planters into privacy screens. I removed the rotted supports and replaced them with posts I had saved. These are buried 3 feet into the ground, with no cement, so they can be re-positioned later if I want. I’ll be sure to post again when everything is in leaf and bloom, but while the bushes are bare you can see the screen more clearly.

When I manage to finish all of that, the upper trim around the house and gutter system needs a complete cleaning and painting. Lots of the basics — weeding, mulching, trimming, mowing and edging — go on pretty much year round. Here’s a winter tip to make quick work of a messy, windswept yard: We find that it is much easier to run the mower over the grassy areas every month or so even in winter to pick up the leaves that blow in and smooth out the clumps of grass than it is to rake the whole yard over and over.
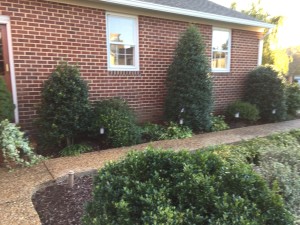
Here is another area that I edited. It had become crowded and one of the bushes had died. I balanced out the azalea bushes on either side of the Holly tree and divided and replanted the hosta in a wave. An edit every few years it helps to keep things fresh.

Here is another area that I edited. It had become crowded and one of the bushes had died. I balanced out the azalea bushes on either side of the Holly tree and divided and replanted the hosta in a wave. An edit every few years it helps to keep things fresh.

Last fall I did manage to finish re-making the planters and arbors and reinstall them. Using the leftover lumber from other jobs that I had stored in the garage, I added extra posts so that the planters could be used as privacy panels (hiding the less-than-pretty necessities that are stored under the deck). Then I planted the rose bushes, which had been in pots before, and divided and replanted the liriope to fill out the garden. Also, five other areas of the garden were edited and simplified. Plants had grown so out of bounds over the years, and it was time to selectively remove and transplant many to new locations. Now there is some breathing room, with nothing crowded. I added another three cubic yards of mulch to spruce up the beds, and then the cold weather set in.

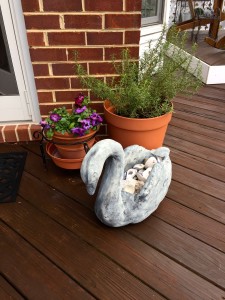
This fun garden ornament has so much personality. It spins and bobs in the wind! I would love to incorporate a few more interesting things throughout the gardens like this.

This fun garden ornament that I was gifted has so much personality. It spins and bobs in the wind! I would love to incorporate a few more interesting things throughout the gardens like this.

On the creative side of things, I’m looking forward to making some stepping stones to access some of the deeper garden beds more easily.

Lastly, I received a really fun garden ornament from my sister, and it adds so much personality to the garden. Thank you, Tracy! It makes me want to incorporate a few more special things to spice things up! More on that later…

What are your goals for 2017 out in the garden? I’d love to hear!

Save

Save

Save

Save

Save

Save

Save

Happy New Year to All-

Time to start putting those  dreams to reality. All the best to all the gardeners out there-

Time to start putting those dreams to reality. All the best to all the gardeners out there-

Save

Save

Save

Save

Save

Perfect Time for a Garden Critique

With the Fourth of July here, most plants in the garden have filled out to their maximum for the year. This makes it the perfect time to take a critical look at their placement.

Lillies under a peartree in my back garden. These require careful division each year because they are exceptionally fast growing.

You can easily see which plants will benefit from a move in the fall. Even though I try to respect the garden tags which show mature sizes of the plants when I buy them, they are not always accurate. It is also the perfect time to look closely at the perennials to see which ones are candidates for being split. Long ago I heard a phrase that is very accurate about perennials: The first year they sleep, the second they creep, and the third year they leap. If you follow that rule, every third year or so you would split or divide them. I find it helps to keep a notebook on this, because as your garden grows, there can be a lot to remember! In my garden I do the plant moving between mid-October and mid-November, but in your region, just pick a time after they are past their peak for the year, but still have time for the roots to establish before the full effects of winter are upon them.

That brings up another topic — the effects of winter. We had a couple of severe winters recently, and with them a lot of snow damage. I try to remove all the broken branches, but then leave them alone for a year to see if they will recover, before reshaping them back to a natural point. By doing this you can see where the plant can redirect its existing branches, and if it can fill in the holes left by the damage. If it isn’t going to be able to heal, by that point, I like to replace it with another.

In this garden I will be adding 3 Crepe Myrtle trees to help with the intense summer exposure.

I also like to evaluate how the plants are doing with regard to the sun exposure that they get.  Even if a plant is one that can tolerate full sun, it may need some respite from the intense afternoon sun, or moved to a location that gets a half-day worth of sun.

It is also a good time to trim up the lowest tree branches. If you keep them limbed up to six or seven feet it makes it much easier to mow and to stand under them.

Not that I need any more reasons to go out and enjoy my garden, but it is really gratifying to walk the entire yard and check out how things have grown. It is an important step to critique and edit, and I love planning towards the next year and beyond. Time to go enjoy the fruits of your labor, and don’t forget your notebook!

Despite our best efforts…

Sometimes things beyond our control can mess up even the best made plans. I have had a string of “disasters” myself.

Tornado damage- tree torn in half.


Over the last few years my yard has been attacked by a small tornado, several rounds of utility digs (one in which they dug 13 grave-sized pits), a cherry tree being killed by the same disease that caused the Irish potato famine, and most recently, my once beautiful purple-leaf maple succumbing to a three-foot gash on the trunk.

The maple tree in better days.


When the cherry tree died, I sent a branch to our local Horticulture Extension Service and the lab technician said something to me that is very worthy of sharing. She said, “Try not to think of the tree dying as a failure, but rather as an opportunity to try something new.” So when I look out at my yard today and see the corkscrew willow that replaced the cherry, I think how right she was. It is so tall and beautiful now, and so I will tell myself that, as the maple tree comes down, there will be a beautiful group of crepe myrtle trees to hold its place.

The Purple Maple today.


I guess after so many years of nurturing the trees along, they really do become my garden friends, or so I think of them that way. So, I leave you with the thought of trying something new, where you might never have thought you would, if circumstances had not changed. Sometimes a fresh change can give you a whole new perspective.

Stay tuned….

Divide and Conquer – Segmenting your garden beds

Now that you have thought through an overall plan for your yard, it’s time to start planning the individual garden beds. In my own garden I designate a name to each bed by location (for example: front left, front right, side yard, etc.), another way would be to number them. I try to divide them into sections that can easily be maintained in less than 15 minutes on a normal schedule. It depends on how much time you personally have to spend in your yard at one time. I find that if I work my way around the garden in this manner, I can know exactly where to stop and start back up.

Prioritizing maintenance from most to least visible, is another way of making sure that the garden looks the way you want it to. For instance, I will do a quick walk through of the previously worked on sections, before starting in on another. I find this is the easiest way to keep a mental note on what to work on next time I get to that section. I always start with the front door — that’s just me — but I always like it to be as nice as I can make it.

A lot of people ask about how deep and wide to make a garden bed. For this, I think a good rule of thumb is to look at the height of your house. In general your ideal depth should be 1/3 to 1/2 the overall height. My house is approx. 30 ft. high, so my front bed is 15 ft. deep. As well the width should span to 1/3 to 1/2 the overall height beyond the edge of the house. This keeps the proportions right. You always want the surrounding beds to visually anchor the house to the land.

Now that you know my formula for sizing and segmenting beds into manageable sections, I hope it will help you to divide and conquer your own garden.

A close look – Getting to know your garden

For my first blog I am starting at the beginning.

It’s important to know your terrain. All the hills and valleys, where it’s flat, etc. Walk your entire yard, and look at your property from every window, walkway and driveway, even from across the street. All of these areas will become important in figuring out your focal points. Once that is done you can start with your plan.

There are many solutions to terrain imperfections. For instance, you might consider creating some elevation to a flat yard by adding a berm, or terracing a steep yard to maximize your usability.

Another consideration is where to steer your rain water, and downspouts.  There are many good options, and more being thought up all the time. (Dry wells, rain barrels, rain bladders, rain gardens, ponds, etc.)

This is also the time to decide where you want your walkways and drives to be. Consider installing them in the sun if you live where it’s snowy, and in the shade if you live where it’s hot. Also, designated areas for relaxing (decks, patios), and recreation (pool, open space, etc.).

Knowing your yard is your most important step in planning, and worth a lot of thought. It can save you countless hours of redoing in the future, not to mention expense and effort. I will discuss each of these topics, and many more, in future blogs at greater length, so stay tuned.

I promise to keep my blogs short and meaty, so that’s my food for thought today. Enjoy!

Sharing Buttons by Linksku